We are going to share with you how to make a beautiful work of art that depicts the ocean. It’s shiny and the waves look ultra-realistic. We’re talking about resin artwork!
Layers of glossy resin create a realistic ocean image that shows depth and movement. Ocean resin art pieces almost look like photographs of the sea. You can turn the surface of a table, canvas, piece of wood or glass, or coaster into a marine masterpiece!
We are going to walk you through the process of making your own ocean resin artwork.

What is resin art?
Resin is a viscous gel-like liquid made up of several chemicals that becomes a solid, similar to plastic but glossier and sturdier. It can be used in many different projects. Resin is used in woodworking, jewelry making, tabletop art, wall art, and mold casting.
Epoxy resin is generally what is used for art projects. It is a translucent solution that color can be added to and when it cures it becomes glossy and firm. Cured resin just means it is in its dry form.
Resin is a two-part solution, meaning there are multiple parts to mix together. Once cured, the resin is hardened.
The scales used for Finfolk Production’s Mythic tails are made out of resin.
The history of resin art
In 1934, epoxy resin was patented by a German man named Paul Schlack. A Swiss chemist named Pierre Castan popularized using resin for dental prosthetics. Resins were used industrially until around the 40’s and 50’s, when artists began to utilize epoxy resin for their work.
Today resin is used for myriad artistic purposes and is readily available.
What is the best resin to use for an art project?
For a resin art project you want to use epoxy resin. Kits can be bought from craft stores and online, but the best of the best in our opinion is MAS Epoxy. It is durable and clear and is the most high quality resin for a surface coat project.

Is resin art expensive?
Yes, Resin Art can be quite an expensive hobby. That’s mainly because the Epoxy Resin can be costly if you create bigger Resin artworks. On average you can expect to pay $20/liter of resin. A trial unit of MAS epoxy is $39.99 and contains 2 bottles of 16 ounces. A gallon costs $74.99.
How much resin do I need?
The amount of resin you need to use depends on the project. If you are doing a coaster it would be about 3oz of resin but you can mix more as needed for bigger projects. You’ll likely use around 30 oz for a large board.
Epoxy resin quantity calculator
Here is a list with their pricing of all the equipment I use in the video below:
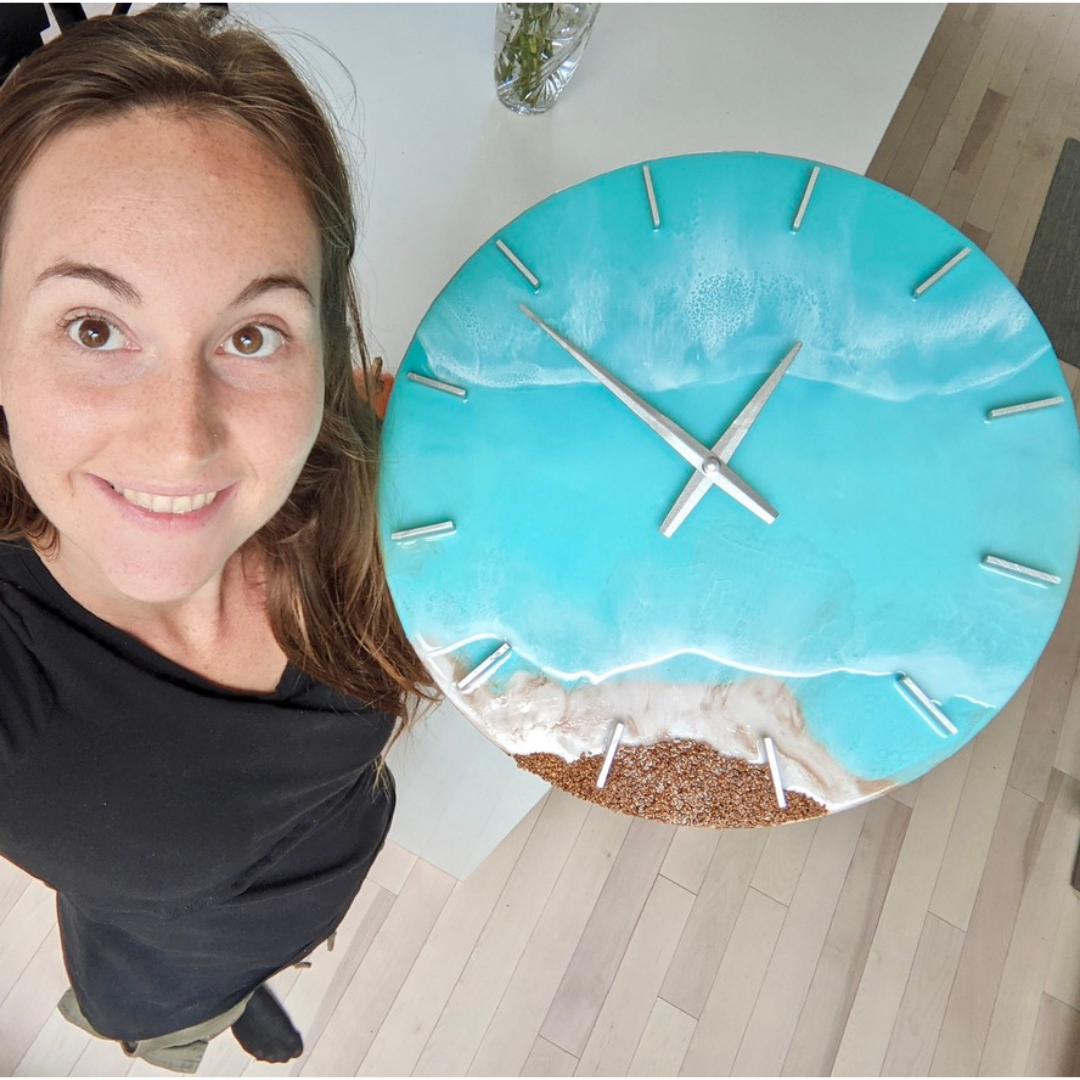
$US51 16" Round Clock Kit with Shiny Silver Clock Hands and Matching Ticks
$49.00 2 Quart Table Top Epoxy
$US 34,65 Polynesian Paradise Color Pack (Turquoise-Blue, Light Green, White Easy Flow Armor Art brand)
$US 8.46 Barbados Crushed Walnut Shells (2 Cups)
DISCOUNT CODES:
- I am using MAS epoxy, you can use the code AQUAMERMAID to get free shipping here!
- Bear Woods is a great company for various resin art supplies use code AQUAMERMAID for additional savings through Bear Woods Supply Company, some exclusions apply. (Delivers to United States and Canada)
My Amazon list of general equipment for resin art
How to make ocean resin art?
Epoxy Resin art step by step directions:
- To prep your space be sure to cover the surface you’re working on and the floor. You could use newspapers or a disposable tablecloth. Make sure the room is well ventilated because you don’t want to breathe in the chemicals from the resin. Wearing a vapor mask is recommended.
- Have all your supplies ready:
- Rubber gloves
- Tongue depressor or craft stick
- Plastic container to measure out the resin, could use a mouthwash cup or empty yogurt container
- Resin and resin hardener (Part A and B)
- Blue and white pigments
- Wooden board, Butane torch
- Heat gun
- sand
- Measure out equal parts of resin and hardener solution. Use a wooden stick to mix it.
- Divide the mixture into 5 parts. (About ¼ light blue, ¼ dark blue, ¼ Sand, ⅛ White and ⅛ transparent)
- Add a few drops of blue to one mixture. Use no more color than 6% of the resin solution, otherwise it will start to cure prematurely. You can use oil paint, acrylic paint, alcohol ink, resin dye, or pigments.
- Add fewer drops of blue into another mixture. You want two different shades of blue. One a dark blue and the other a lighter blue, almost turquoise. You could use different amounts of one shade of blue or get two different shades.
- Add sand to the third mixture to make it a thick and gritty sand-colored mixture.
- The last mixture should be tinted white.
- Plan out a layout for your resin. You can create different patterns for the water. The waves can be horizontal across the board or at a slant. You can also make the shoreline curvy.
- Start with the sandy mixture. Pour it on one half of the board and begin smearing it around with a gloved hand. You could also use a wooden stick to spread it around.
- Let it sit 24 hours to harden so when you pour the next layers they don’t mix too much.
- Start pouring the lighter blue mixture next to the sand mixture so that they are touching. Smear the resin across the board, leaving a space for the darker blue resin.
- Pour the darker blue resin mixture next to the lighter blue and begin to smear it around, letting the edges blend with the lighter blue.
- Pour strips of the lighter blue and darker blue across the ocean part and smear them in to create a nice gradient effect.
- Pour a small strip of transparent resin in between the sand and the light blue.
- Drizzle the white resin (or use white alcohol ink) lengthwise where the sand meets the water on top of the transparent resin and in strips going across the water part.
- Use a heat gun to heat the surface of your resin pointing down toward your painting from far and burst some bubbles if there are some. Place your heat gun on a 45°angle to push the white resin sideways around, creating lacing and ripples that look like real waves. A hairdryer will also work but it will move the waves more. * TRICKS, push the white pigment on top of the other resin pushing it sideways and not inside it blowing from the top. Take 2-5 seconds breaks in between each heat gun blowing session and let the lacing appear before blowing again. You can also lift and tilt your board to stretch the lacing bubbles.
- Let cure for 24 hours
- Drizzle more strands of blue and make white waves as you see fit, this layering creates a depth. You need to wait 24 hours in between each layer.
- If you want you can add little seashells to the uncured resin and they will be secured once resin cures fully.

Summary of making resin art
CANVAS
You will need the resin components and a surface to pour the resin over. It could be a piece of wood, Plexiglas, glass, or metal. Canvases are not recommended because they are not always sturdy enough to withstand the weight of the resin. Be sure to get a nice flat base for your project.
WORK SPACE
Resin is a sticky solution prior to curing, so you’ll want to cover the surface you work on and wear gloves. It is very hard to clean up. Don’t work in nice clothing; An old t-shirt and a heavy duty apron is a good idea. Use tongue depressors or popsicle sticks for stirring since they can just be disposed of afterwards.
RESIN
You combine equal amounts of the resin and the harder. Then it requires lots of stirring until the solution is clear. Be sure to scrape the sides of the inside of the container to get everything fully incorporated.
PIGMENTS
You use pigments to color the resin in several different shades of blue. To get the ocean look requires strategic layering of the different colors that you pour across the surface. You can also paint the background first to give more vibrant colors. You need to let each layer cure 24 hours before pouring another layer. This adds depth to make it look more realistic.
Use blue colored resin to make the ocean and white alcohol ink to make the waves. You can also pour sand colored resin for the beach, or you could just use a piece of wood that already has a sandy color. The best way to do the sand part is to use actual sand that you’ve mixed into the resin. This adds a nice texture.
Never mix more than 6% of color pigment with your resin, if you add too much it will affect the curing property or the resin.
TYPES OF PIGMENTS
Which type of color pigment can you add to epoxy resin?
- Liquid/paste Pigments: is particularly suitable as a colorant for epoxy resin because it is very easy to mix with the liquid resin. The liquid epoxy paint dissolves very evenly in it and ensures a homogeneous coloring of the casting resin.
- Ink: Yes, this is possible. Simply add a few drops of alcohol ink after mixing the resin and hardener. Basically, Alcohol Inks are even better than some other options for coloring the resin, because the transparency of the material can be kept as far as possible despite the coloring
- Mica powder: Mica is a natural stone that, when ground, becomes mica powder. Since mica stones have a sparkle to them, their powder has a lustrous shimmer. With color pigments in powder form, epoxy resin can usually be colored very easily and effectively. High-quality color pigments should be dosed very sparingly, as they have a high coloring power. The exciting thing about powdered color pigments is that they often do not dissolve completely in the liquid resin. This results in slightly grainy color effects in the resin, which can be aesthetically quite appealing.
- Glitter pigment: To prevent the glitter from sinking at the bottom of your resin use really fine glitter like Pearl Ex Powdered Pigments or makeup glitters work as a fantastic substitute. Resin pigment powders are super-fine and lightweight, which means they’re unlikely to sink but that may vary depending on the brand. If you use bigger and heavier glitters wait for the resin to start becoming a gel before adding them in it will prevent them to sink.
MIXING TECHNIQUES
There are 2 main mixing techniques, the first one you pour your resin in different cups and add a different pigment in each cup. The second one you only use one mixing cup and you add step by step different colors in the same cup. It keeps the same initial tone and you can pour a bit of each color on your canvas and gradually modify the color as you pour some on your art piece.
WAVES (RESIN LASCING)
To make the waves look realistic you can use a heat gun to push around the ink and create a nice lacy effect. Lacing is the effect where pigmented resin separates out and creates a look that resembles lace.
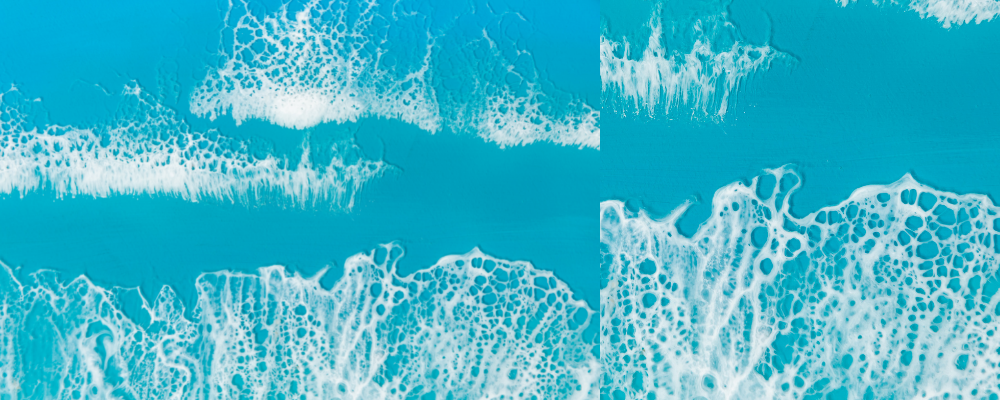
What makes the lacing in resin?
The most common way is to use paints of various densities. Every paint has a different density based on the pigments that are used. These differing densities mean that each paint weighs more or less than other paints when comparing the same volume of each. More dense paints like titanium white will “sink” into less dense paints like blue. This happens because the white is denser than the blue and has a greater specific gravity. To create cells, you can use this physical property of fluid paint to manipulate how the paints will rise and sink when combined by stacking more dense paints on top of less dense ones. When paints rise and sink, they gather small bits of the paint they are moving through. When bubbles of lighter paint move up to the top of the painting, they create cells. You can get a general idea of the weight of paints based on this documentation provided by Golden Paints.
Decorations: add shells, mermaids. fishes... If you want to create an even more realistic and 3D look you can add seashells and sand to the beachy part. When the resin hardens, they will be encased in it. You can print mermaids or fishes and insert with a resign layer.
That’s it! Now your piece is ready to be displayed! This piece will add some mer-mazing charm to any home. It is the perfect decoration for a beach house! For more mermaid home décor ideas, be sure to check out this video on Marielle’s dream mermaid home!
If you decide to make your own ocean resin art piece be sure to tag us #aquamermaid in it so we can admire it!
Great ressource for the science behind Resin painting https://leftbrainedartist.com/acrylicpourcells/